In this article we will show you how to use Scapy to broadcast forged beacon frames for a fake Wireless Access Point.
How does your laptop, workstation or smartphone know which wireless networks are available nearby? It’s actually very simple, Wireless Access Points (often your broadband router in a SOHO environment) continually broadcast beacon frames. Beacon frames include information about the access point, such as the SSID, supported data rates and what encryption is being used. These are received by your device’s wireless network interface and interpreted by your operating system to build the list of available networks.
I wanted to see if I could forge beacon frames using Scapy to add a fake wireless network to the list on my local system. Scapy is a packet manipulation library that allows sending, forging and capturing of network packets. It was written in Python and supports a wide range of protocols.
In this tutorial, we will advertise a network called “testSSID” with WPA2 security using either TKIP or AES encryption.
Creating the Python Script
To start, we need to import the Scapy modules that are going to be used:
from scapy.all import Dot11,Dot11Beacon,Dot11Elt,RadioTap,sendp,hexdump
The following variables are created and assigned the following values to form the beacon frame:
netSSID = 'testSSID' #Network name here
iface = 'wlan0mon'   #Interface name here

dot11 = Dot11(type=0, subtype=8, addr1='ff:ff:ff:ff:ff:ff',
addr2='22:22:22:22:22:22', addr3='33:33:33:33:33:33')
beacon = Dot11Beacon(cap='ESS+privacy')
essid = Dot11Elt(ID='SSID',info=netSSID, len=len(netSSID))
rsn = Dot11Elt(ID='RSNinfo', info=(
'\x01\x00'
'\x00\x0f\xac\x02'
'\x02\x00'
'\x00\x0f\xac\x04'
'\x00\x0f\xac\x02'
'\x01\x00'
'\x00\x0f\xac\x02'
'\x00\x00'))
Note you will have to make sure that “iface” is equal to the name of the interface you want to use on your device.
For the variable “dot11” the parameters mean the following:
| type=0 | To indicate the frame is a management frame (type 0). |
| subtype=8 | To indicate the management frames subtype is a beacon (type 8). |
| addr1 | Destination MAC address. |
| addr2 | Source MAC address of sender. |
| addr3 | MAC address of Access Point. |
The “beacon” variable indicates the capabilities of our access point. Here we are saying it is an ESS network and the “privacy” parameter was required for the network to appear secured when discovered from an Apple device.
To define the network as WPA2, we need to add a Robust Secure Network (RSN) Information Element (IE) to our management frame. The variable “rsn” contains this information and is specified to Scapy in hexadecimal.
Comments on each line indicate what the hexadecimal values mean:
rsn = Dot11Elt(ID='RSNinfo', info=(
'\x01\x00'              #RSN Version 1
'\x00\x0f\xac\x02'      #Group Cipher Suite : 00-0f-ac TKIP
'\x02\x00'              #2 Pairwise Cipher Suites (next two lines)
'\x00\x0f\xac\x04'      #AES Cipher
'\x00\x0f\xac\x02'      #TKIP Cipher
'\x01\x00'              #1 Authentication Key Managment Suite (line below)
'\x00\x0f\xac\x02'      #Pre-Shared Key
'\x00\x00'))            #RSN Capabilities (no extra capabilities)
The rest of the script builds the frame and shows it before prompting the user to begin sending the frames:
frame = RadioTap()/dot11/beacon/essid/rsn

frame.show()
print("\nHexDump of frame:")
hexdump(frame)
raw_input("\nPress enter to start\n")

sendp(frame, iface=iface, inter=0.100, loop=1)
Sendp is used to send our broadcast frame. “inter=0.100” combined with “loop=1” will cause a frame to be sent every 100 milliseconds until the program is exited.
The whole script should look like the following:
from scapy.all import Dot11,Dot11Beacon,Dot11Elt,RadioTap,sendp,hexdump

netSSID = 'testSSID'       #Network name here
iface = 'wlan0mon'         #Interface name here

dot11 = Dot11(type=0, subtype=8, addr1='ff:ff:ff:ff:ff:ff',
addr2='22:22:22:22:22:22', addr3='33:33:33:33:33:33')
beacon = Dot11Beacon(cap='ESS+privacy')
essid = Dot11Elt(ID='SSID',info=netSSID, len=len(netSSID))
rsn = Dot11Elt(ID='RSNinfo', info=(
'\x01\x00'                 #RSN Version 1
'\x00\x0f\xac\x02'         #Group Cipher Suite : 00-0f-ac TKIP
'\x02\x00'                 #2 Pairwise Cipher Suites (next two lines)
'\x00\x0f\xac\x04'         #AES Cipher
'\x00\x0f\xac\x02'         #TKIP Cipher
'\x01\x00'                 #1 Authentication Key Managment Suite (line below)
'\x00\x0f\xac\x02'         #Pre-Shared Key
'\x00\x00'))               #RSN Capabilities (no extra capabilities)

frame = RadioTap()/dot11/beacon/essid/rsn

frame.show()
print("\nHexdump of frame:")
hexdump(frame)
raw_input("\nPress enter to start\n")

sendp(frame, iface=iface, inter=0.100, loop=1)
Setting a Wireless Interface to Monitor Mode
Before we run the script, we need to make sure we have the wireless interface we want to use set to monitor mode which provides access to send and receive wireless management frames. Since I am using Kali Linux, I can use the following commands to find the name of my wireless interface and set it to monitor mode.
List the wireless interfaces:
root@kali:~# airmon-ng

PHY  Interface  Driver    Chipset

phy0  wlan0     rt2800usb Ralink Technology, Corp. RT2870/RT3070
Check for running processes that could interfere with setting the interface to monitor mode:
root@kali:~# airmon-ng check

Found 2 processes that could cause trouble.
If airodump-ng, aireplay-ng or airtun-ng stops working after
a short period of time, you may want to kill (some of) them!

 PID Name
 647 NetworkManager
 755 wpa_supplicant
Killing processes that could interfere:
root@kali:~# airmon-ng check kill

Killing these processes:

 PID Name
 755 wpa_supplicant
Setting the interface to monitor mode:
root@kali:~# airmon-ng start wlan0
PHY   Interface  Driver     Chipset
phy0  wlan0      rt2800usb  Ralink Technology, Corp. RT2870/RT3070

        (mac80211 monitor mode vif enabled for [phy0]wlan0 on [phy0]wlan0mon)
        (mac80211 station mode vif disabled for [phy0]wlan0)
Note our interface was set up as wlan0mon which is set in the iface variable in our Python script.
Running the Script
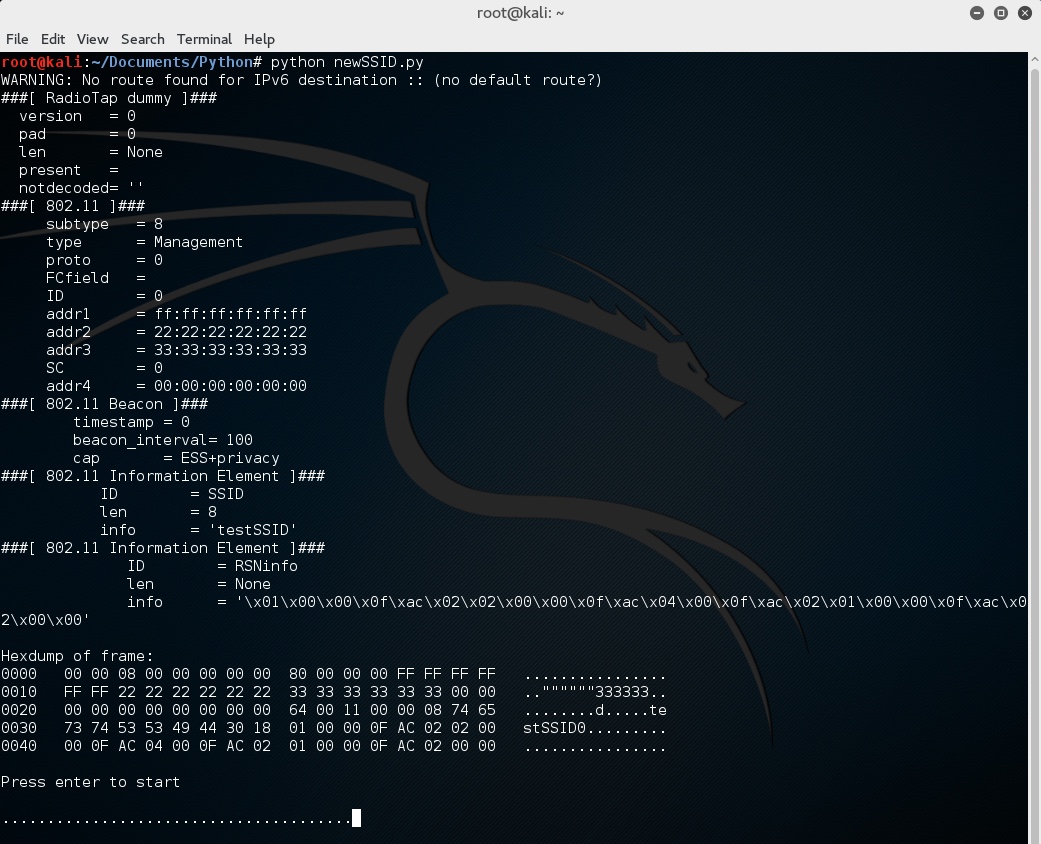
Now that we have an interface in monitor mode we are ready to run the script. When running the script you should see the following information:
root@kali:~/Documents/Python# python newSSID.py
WARNING: No route found for IPv6 destination :: (no default route?)
###[ RadioTap dummy ]###
 version = 0
 pad = 0
 len = None
 present =
 notdecoded= ''
###[ 802.11 ]###
 subtype = 8
 type = Management
 proto = 0
 FCfield =
 ID = 0
 addr1 = ff:ff:ff:ff:ff:ff
 addr2 = 22:22:22:22:22:22
 addr3 = 33:33:33:33:33:33
 SC = 0
 addr4 = 00:00:00:00:00:00
###[ 802.11 Beacon ]###
 timestamp = 0
 beacon_interval= 100
 cap = ESS+privacy
###[ 802.11 Information Element ]###
 ID = SSID
 len = 8
 info = 'testSSID'
###[ 802.11 Information Element ]###
 ID = RSNinfo
 len = None
 info = '\x01\x00\x00\x0f\xac\x02\x02\x00\x00\x0f\xac\x04\x00\x0f\xac\x02\x01\x00\x00\x0f\xac\x02\x00\x00'

Hexdump of frame:
0000 00 00 08 00 00 00 00 00 80 00 00 00 FF FF FF FF ................
0010 FF FF 22 22 22 22 22 22 33 33 33 33 33 33 00 00 ..""""""333333..
0020 00 00 00 00 00 00 00 00 64 00 11 00 00 08 74 65 ........d.....te
0030 73 74 53 53 49 44 30 18 01 00 00 0F AC 02 02 00 stSSID0.........
0040 00 0F AC 04 00 0F AC 02 01 00 00 0F AC 02 00 00 ................

Press enter to start
From the above, we can confirm the structure of the beacon frame, its properties and view a hex dump of it.
Pressing enter will start broadcasting the beacon frames:
At this point, devices with wireless network interfaces should be able to see the network:
root@kali:~# iwlist wlan0 scan
Cell 14 - Address: 33:33:33:33:33:33
           Channel:4
           Frequency:2.427 GHz (Channel 4)
           Quality=70/70 Signal level=-31 dBm
           Encryption key:on
           ESSID:"testSSID"
           Mode:Master
           Extra:tsf=0000000000000000
           Extra: Last beacon: 2428ms ago
           IE: Unknown: 00087465737453534944
           IE: IEEE 802.11i/WPA2 Version 1
               Group Cipher : TKIP
               Pairwise Ciphers (2) : CCMP TKIP
               Authentication Suites (1) : PSK
To exit the script, press “ctrl + c”.
Since we’ve only created wireless beacons, attempting to connect will fail as there is no real access point.
Summary
This is a simple demonstration of how easily these frames can be produced, far more complex wireless attacks exist and open source tools to perform them are available but it serves to highlight that connecting to any wireless network should be done with caution as the identity of that network cannot necessarily be trusted.
