This is the final post in our series on analysing Hacking Team’s ‘Galileo RCS (Remote Control System)’. In our previous post we showed how to detect this system on your networks. In this post we’ll be drawing together all of the information we’ve gathered on the system to attribute samples to specific Hacking Team clients, achieving the ‘holy grail’ of threat intelligence.
Threat Intelligence is information about an adversary that allows us to effectively defend ourselves. It comes in many different forms, but can broadly be split into four ’tiers’: Strategic, Tactical, Operational and Technical, as summed up by the graphic from the Centre for the Protection of National Infrastructure (CPNI) below:
 Threat Intelligence Model from the CPNI
If you’d like to read more from the CPNI, they have excellent guides available here:
In our blog posts to date, we’ve covered the Technical quadrant of this threat intelligence picture, giving indicators of compromise and detection mechanisms to defenders. These allow a network defender to be sure that there was a Hacking Team infection on their network. However, it is generally very easy for an adversary to change their technical indicators. Merely re-compiling will defeat hash-based signatures for instance. Therefore as defenders it is most useful to understand the adversaries Tools, Tactics, Techniques and Procedures (TTTPs). If we can observe a specific actor (or group of actors) for long enough, we can identify patterns in the way that their attacks are carried out, and therefore be ready for them when they come.
A key part of this process is being able to attribute an attack to a particular threat actor. Famous threat actors include APT1, the Chinese group that attacked multiple western defence contractors. Mandiant released the first report of it’s kind in February 2013, pointing the finger of blame squarely at the Peoples’ Liberation Army of China. Tying a digital attack to a real-world organisation is a task fraught with difficulty, as an attacker very rarely leaves their name and contact details behind. This problem was highlighted by the Sony Pictures Hack, where a storm of controversy erupted over who was actually responsible for the attack.
With the Hacking Team leak however, we have enough information to tie a sample to a specific Hacking Team client agency.
This is only possible due to Hacking Team’s licensing system, where the implants created by each agency are watermarked using a character sequence unique to each client. If we can obtain a sample produced before the leak, we can say with 100% certainty that this implant was produced by the client corresponding to its watermark.
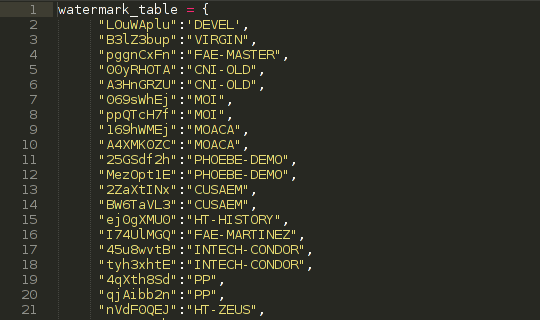 Client Watermarks
For the Windows implants, there are two ways to obtain the watermarks. Scout implants contain the watermark as a string within the binary file, so no special tool is needed to parse the watermark and attribute it. We can then use the watermark database included within the leak to tie this to a hacking team client. (See our post on the ‘killswitch’ for details of this database).
root@4A-JG-Kali:~/GalileoRCS/attribution/samples# strings 3c8ba40fb1847def3f6f599626f8b2d1a3516e9313ce244239b93c9c69d396d3  | grep -C 10 B4y9
_TbF~
	x&n
*1#?
h8,4$
2Ht\l
3(6k
ExitProcess
20ba0000000003
btassist
7gff:
B4y9gjKB7H4m5ehn7Fogy5AuLwg7fKbH
%02X%02X%02X%02X%c%c
%c%c%c%02X%02X%02X%02X
178.79.166.117
SetWaitableTimer
WaitForSingleObject
CancelWaitableTimer
CreateWaitableTimerW
CloseHandle
GetEnvironmentVariableW
GetNativeSystemInfo
We’ve wrapped this up into a small python script, so that we can run it across a large number of samples. Elite level implants are harder to attribute, and require the configuration or the shared memory region (See our post on using the Volatility Framework to discover these artifacts). Once we have this though, the same python tool can be used to tie an elite implant to a specific actor.
root@4A-JG-Kali:/mnt/ramdisk# volatility --plugins=volatility-attributeht -f example_WinXPSP2x86.raw attributeht --extract --dump-dir=configs
Volatility Foundation Volatility Framework 2.4
Hacking Team Galileo RCS Implant Detection - 4ARMED Ltd
PID  Watermark Process Name     Implant Type   Threat Actor Confidence (Low-Certain)
300  B3lZ3bup  pippopippo.exe   Scout          VIRGIN       Certain
1852 3OqZ1N5a  userinit.exe     Elite/Soldier  FAE-FURLAN   Certain
1888 3OqZ1N5a  explorer.exe     Elite/Soldier  FAE-FURLAN   Certain
228  3OqZ1N5a  UsbCipHelper.ex  Elite/Soldier  FAE-FURLAN   Certain
212  3OqZ1N5a  VBoxTray.exe     Elite/Soldier  FAE-FURLAN   Certain
244  3OqZ1N5a  19pivy.exe       Elite/Soldier  FAE-FURLAN   Certain
252  3OqZ1N5a  ctfmon.exe       Elite/Soldier  FAE-FURLAN   Certain
264  3OqZ1N5a  msmsgs.exe       Elite/Soldier  FAE-FURLAN   Certain
292  3OqZ1N5a  rundll32.exe     Elite/Soldier  FAE-FURLAN   Certain
300  3OqZ1N5a  pippopippo.exe   Elite/Soldier  FAE-FURLAN   Certain
Android implants are more complicated to deal with, as samples typically arrive packaged as an APK file. These files are essentially ZIP files however, so we can open them up and analyse the contents.
root@4A-JG-Kali:~/GalileoRCS/attribution/new_android_samples# unzip -l 64b557c0219db851c5dd2361ceeeba68e81bf6446c07e76f8bb137d95ed9cc1b
Archive:  64b557c0219db851c5dd2361ceeeba68e81bf6446c07e76f8bb137d95ed9cc1b
  Length      Date    Time    Name
---------  ---------- -----   ----
     1714  2015-06-22 14:03   META-INF/MANIFEST.MF
     1835  2015-06-22 14:03   META-INF/SERVICEC.SF
     1200  2015-06-22 14:03   META-INF/SERVICEC.RSA
     6408  2015-06-22 14:03   AndroidManifest.xml
     1904  2015-06-22 14:03   assets/cb.data
     9392  2015-06-22 14:03   assets/db.data
   630608  2015-06-22 14:03   assets/gb.data
     5568  2015-06-22 14:03   assets/hb.data
    46528  2015-06-22 14:03   assets/ib.data
   485520  2015-06-22 14:03   assets/jb.data
   573280  2015-06-22 14:03   assets/jbl.data
      256  2015-06-22 14:03   assets/kb.data
    14128  2015-06-22 14:03   assets/lb.data
    57328  2015-06-22 14:03   assets/mb.data
     5648  2015-06-22 14:03   assets/nb.data
   605936  2015-06-22 14:03   assets/ob.data
      198  2015-06-22 14:03   assets/rb.data
    26192  2015-06-22 14:03   assets/sb.data
   534780  2015-06-22 14:03   classes.dex
     6120  2015-06-22 14:03   res/drawable-hdpi-v4/ic_launcher.png
     3156  2015-06-22 14:03   res/drawable-mdpi-v4/ic_launcher.png
     9487  2015-06-22 14:03   res/drawable-xhdpi-v4/ic_launcher.png
    18087  2015-06-22 14:03   res/drawable-xxhdpi-v4/ic_launcher.png
      648  2015-06-22 14:03   res/layout/main.xml
      552  2015-06-22 14:03   res/xml/device_a.xml
     1940  2015-06-22 14:03   resources.arsc
---------                     -------
  3048413                     26 files
The files we’re interested in are cb.data and ‘rb.data’. ‘cb.data’ is the implant’s encrypted configuration file. ‘rb.data’ contains the key for this file, as well as the watermark.
def bin_extract(binary, start, len):
    return binary[start:start+len]

def decrypt_android_config(filename):
    report = {}
    try:
        report['path'] = filename
        report['sample'] = filename.split('/')[-1]

        print "\n{*} - Opening APK rb.data - %s"%filename
        archive = zipfile.ZipFile(filename, 'r')
        data = archive.read('assets/rb.data')

        report['backdoorid'] = bin_extract(data, 0, 14)
        report['aeskey'] = bin_extract(data, 14, 16).encode('base64')
        report['confkey'] = bin_extract(data, 46, 16)
        report['challengekey'] = bin_extract(data, 78, 16).encode('base64')
        report['demomode'] = bin_extract(data, 110,24).encode('base64')
        report['rootrequest'] = bin_extract(data, 134,16).encode('base64')
        report['randomseed'] = bin_extract(data, 150, 16)
        report['persistence'] = bin_extract(data, 182, 16).encode('base64')
We can therefore read the AES key from ‘rb.data’, and use this to decrypt the configuration file in ‘cb.data’. This gives us both the watermark, and the specific configuration for that implant. Again, we can use our database of watermarks to attribute this sample.
So now we have a toolset to attribute both windows and android samples and extract their configurations. One of the first things we looked at is the original analysis of the Hacking Team software performed by Citizen Lab. They made a number of assertions about the providence of the spyware used to target Ethiopean journalists in the US. Using our toolset, we can analyse these samples and determine if this is true or not.
Running our tool over the samples indicates that these journalists were indeed targets of the Ethiopian Intelligence Agency (INSA), confirming Citizen Lab’s suspicions.
{*} - Running Yara over target files
HT_Scout_INSA_61 ../citizenlab_eth//4a53db7b98aa000aeaa72d6a44004ef9ed3b6c09dd04a3e6015b62d741de3437
{*} - Attributing sample
{*} - Found Watermark 74FFGHrh, Codename INSA
{*} - Codename INSA, Client: Ethiopia Information Network Security Agency 10/31/2015 Active Additional sales in progress X 2011
HT_Scout_INSA_61 ../citizenlab_eth//bc68c8d86f2522fb4c58c6f482c5cacb284e5ef803d41a63142677855934d969
{*} - Attributing sample
{*} - Found Watermark 74FFGHrh, Codename INSA
{*} - Codename INSA, Client: Ethiopia Information Network Security Agency 10/31/2015 Active Additional sales in progress X 2011
HT_Scout_INSA_61 ../citizenlab_eth/4a53db7b98aa000aeaa72d6a44004ef9ed3b6c09dd04a3e6015b62d741de3437
{*} - Attributing sample
{*} - Found Watermark 74FFGHrh, Codename INSA
{*} - Codename INSA, Client: Ethiopia Information Network Security Agency 10/31/2015 Active Additional sales in progress X 2011
HT_Scout_INSA_61 ../citizenlab_eth/bc68c8d86f2522fb4c58c6f482c5cacb284e5ef803d41a63142677855934d969
{*} - Attributing sample
{*} - Found Watermark 74FFGHrh, Codename INSA
{*} - Codename INSA, Client: Ethiopia Information Network Security Agency 10/31/2015 Active Additional sales in progress X 2011

{*} - Finding Android APKs in target directory
{*} - Post-processing and sorting reports


{*} - List of unknown client codenames

{*} - List of unknown watermarks
{*} - Attribution complete - successfully attributed 2/3 Samples and Decrypted 0/3 attributed samples
We then ran our tools over every sample we could obtain from VirusTotal. The results of this were dumped out as a JSON file, with each implant listed under the client that created it.
},
        {
            "sample": "765839c50ab5edbfd2faee544ec925fdba9aa9601516fc6b1de7449f3f88db9a",
            "client": "K Iraqi Kurdistan Iracheno 6/30/2015 Active n.a.",
            "c2_servers": [
                "106.187.93.219"
            ],
            "watermark": "45u8wvtB",
            "demo": false,
            "path": "../retrohunt/intelligencefiles/20150821T142004//765839c50ab5edbfd2faee544ec925fdba9aa9601516fc6b1de7449f3f88db9a",
            "codename": "INTECH-CONDOR"
        }
    ],
    "ROS-TEST": [
        {
            "watermark": "M0jk12jf",
            "aeskey": "ryxx84LUa42m9l1ihIrUaA==\n",
            "demo": false,
            "sample": "1254beb27163466f8ce67b79e92542476acade5762583aa888795a9763395ba1",
            "c2_servers": [
                "62.244.11.86"
            ],
            "path": "../retrohunt/intelligencefiles/20150821T142004/1254beb27163466f8ce67b79e92542476acade5762583aa888795a9763395ba1",
            "configuration": {
                "globals": {
                    "migrated": false,
                    "remove_driver": true,
                    "collapsed": false,
                    "quota": {
                        "max": 104857600,
                        "min": 104857.6
                    },
                    "version": 2012041601,
                    "nohide": [],
                    "type": "mobile",
                    "wipe": false,
                    "advanced": true
                },
                "modules": [
Of course this isn’t very visual, so to get the most information out of it, we can plot this data using Google Charts. The graph below shows the number of implants attributed to each agency, and it is very obvious that the vast majority are either development implants (where Hacking Team are testing their detection ratios) or unmodified implants that were never deployed (the ‘VIRGIN’ implants).
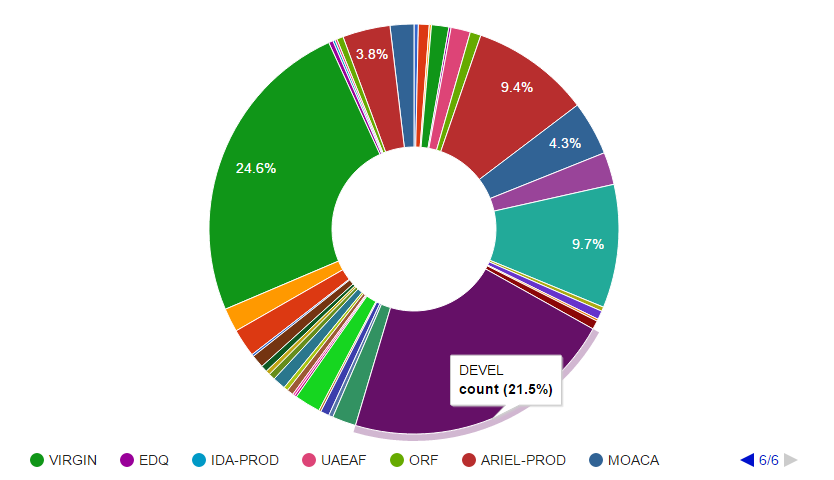 Graph of Attributed implants including development samples
If we exclude these from the data however, we get a more realistic view of which agencies used the Galileo RCS the most.
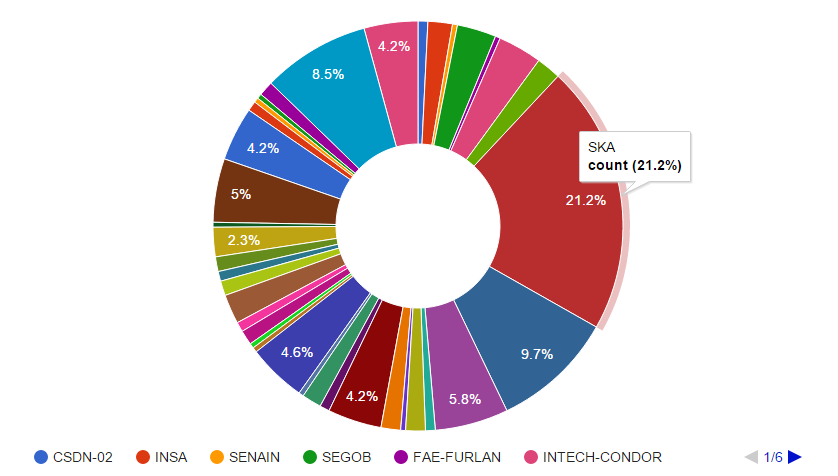 Graph of attributed samples excluding development implants
The largest section is the South Korean Army, which accounts for 21.2% of the total implants. Most of these implants were Android, which raises interesting questions about their targets. In addition, we can also view the C2 servers associated with each threat actor
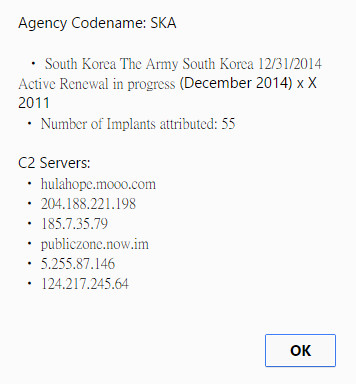 South Korean Army C2 Details
The South Korean Army is also one of the few agencies to use domain names for their implants to call back to, rather than purely IP addresses. These provide Technical indicators that network defenders use in their efforts to secure their estates.
If you’d like a copy of the data used for this, if you’d like us to attribute a sample or if you have any concerns about the effect of the Hacking Team leak on your business please get in touch with us.
